The Bill of Materials
The complete list of components, consumables and tools needed can be found in this Bill of Materials. In this list, all the specifications were verified, but double-check because the seller may change the products over time.
In the comments, I also added a few reminders about the specs, alternatives, pros and cons. It’s very easy to get confused and buy wrong sizes, standards, hoses that doesn’t resist to high pressure, among others. Therefore, I highly recommend checking the comments before adding any component to your cart. Here, I’ll give you the detailed information about the BOM, but feel free to skip to the step-by-step procedure.
1.Pressure gauge options
a. Pressure gauge with capillary tube:
This is the model used in most high-end espresso machines. The very thin tube minimizes the vibration in the needle produced by the pump, allowing you to read the pressure.
The disadvantage is that you have less options available and they are more expensive. The capillary tube and the pressure gauge will cost around 35 dollars against 15 for the liquid filled models.
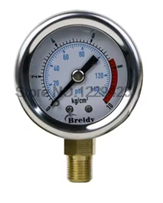
b. Pressure gauge liquid filled:
This is my recommendation for an easier and more universal compatibility but notice that it needs to be liquid filled and not the dry one. In this video, I show the oscillation in the dry version.
Here are other relevant points of attention or decision:
i. Size: 40 mm is ideal, in my view, and I wouldn’t buy anything bigger than 63 mm which seemed already disproportional in some installations that I’ve seen.
ii. Unit: I’m sure you prefer in Bar, but in my experience, sometimes I found in bar, but not small enough, or with horizontal connector, or 1/8 in diameter, or above 15 bar. If you find in Kg/cm3 is about the same (1 Kg/cm3 = 0,98 Bar). MPa is also easy to make the correlation: 1 MPa = 10 Bar. In the BOM, I listed the most appropriate one that I found.
iii. Pressure range: the gauge is most precise in the middle of the range. Then, to measure 9 Bar, ideally you should buy one up to 18 Bar.
iv. Thread standards: you will find connectors, fittings and components either in NPT (North America) or BSP (the rest of the world). To make your life easier, buy everything in just one standard, and BSP will be easier to find compatible components.
v. Thread diameter: it will be easier to buy everything in 1/4 or 1/8. If you have a Rancilio Silvia, buy 1/8 to save some adaptors from 1/4 to 1/8.
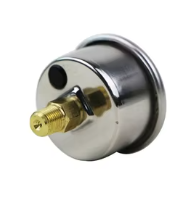
vi. Vertical or horizontal connection: it’s easier to install the models with horizontal connections, but you can also buy an elbow if only the vertical meets other requirements that you may have.
 Vertical Model
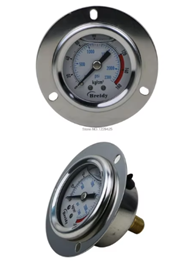
Horizontal model
vii. Plan beforehand where you will install and how you want to fix it. Some examples:

2. Tee 3 ways: the first thing you need to decide is if you want to use threaded connections or quick release. I heard more cases of leakage or lower durability when using the quick release system, then, I always buy the threaded versions. For Rancilio Silvia, I am using a female-female-male 1/8 BSP. This component is installed between the pump and the boiler, and the 3rd pipe will connect to the pressure gauge. Bear in mind that your decisions will affect the choices for the next component, the fittings. If your machine has silicone braided hoses such as Gaggia Classic Pro and Saeco Poemia, you will need the barb tail connections and clamps.
3. Fittings: you may need two males to connect to the females in the Tee, another female to connect to the male in this same Tee, and another female to connect to the pressure gauge. Notice that it needs to have the same diameter of your hose. In my Rancilio Silvia, I’m using 6mm external diameter and 4 mm internal diameter. Then, the fittings are 1/8, OD 6 mm. Remember that if you chose the quick release, you only need to pay attention to the diameter. If your machine has silicone braided hoses such as Gaggia Classic Pro and Saeco Poemia, you will need the barb tail fittings and clamps.
In my Rancilio Silvia, I needed male to connect the Tee to the hose that goes to the pressure gauge and one female to connect the hose to the pressure gauge. The other two ends of the tee were connected to the existing elbow and to the pump. Notice that I connected the elbow to the braided hose that goes to the boiler, however, a better idea would be to connect it to the Tee and using the elbow to the pressure gauge for more flexibility on the angle depending on where your hose needs to go:
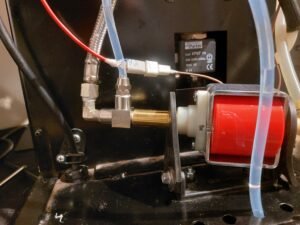
Tee connected to the elbow and to the pump

Female fitting to connect the hose to the pressure gauge
4. PTFE Tube: besides the external and internal diameter, another point of attention is the maximum pressure of operation. Many vendors don’t inform, others can resist to no more than 10 Bar. The one that I linked goes up to 180 Bar.
5. Glycerine: circa 20-30 ml shall be sufficient. This is easily available in cosmetics stores, pharmacies and online.
6. Teflon tape: to avoid leakages in your connections, I highly recommend applying some tape even before testing. In my installation, I had to redo in two points because I could see a few drops even with some tape applied.
7. Clamps (if using barb tail fittings): you may use the worm drive clumps or crimp clamps. Worm drive clamps will be cheaper, but it may be difficult to fit 3 of them in your tee inside the tight space in your machine. Crimp clamps will give you a much better finish, occupy less space, but it will require the crimping tool.

Worm drive clamp

Crimp clamp

Barb tail tee
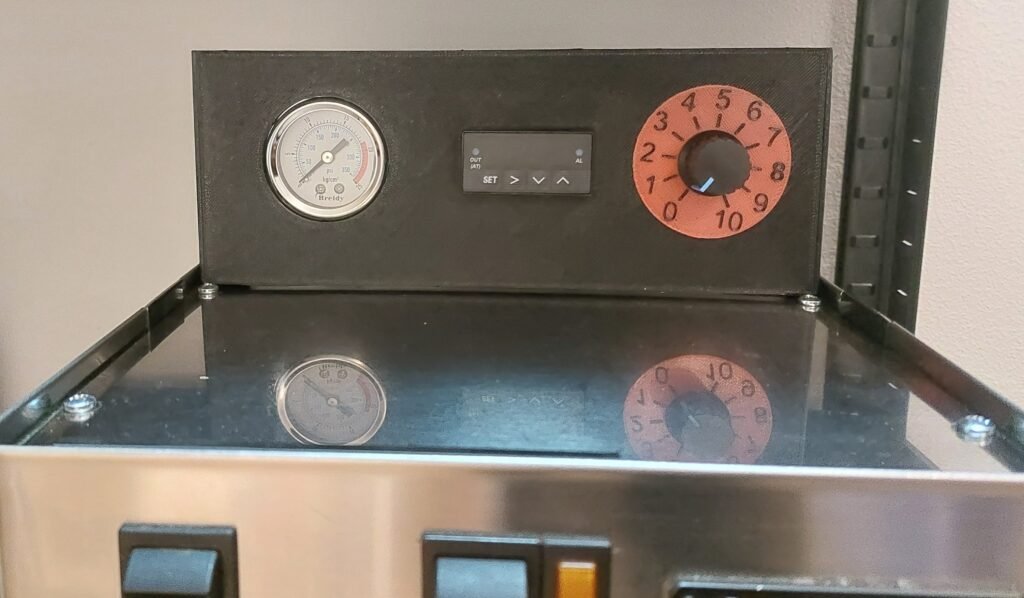
8. Enclosure for external installation: I designed a 3D print top box for my Rancilio Silvia to house the PID, dimmer and the pressure gauge. The model is free to download at https://makerworld.com/en/models/684319
9. Tools:
a. Wrenches and adjustable wrench: you will have to check the sizes in your machine, but I recommend having also an adjustable wrench because in some moments you will use in pairs, to keep one part fix and tighten the other.
b. Scissors: to cut the PTFE tube.
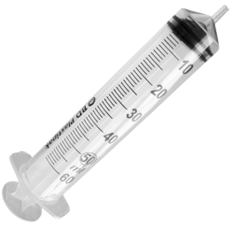
c. Syringe: to inject the glycerine in the pressure gauge. I recommend a thicker one, with the long tip, since the viscosity is relatively high and there’s no much space between the hole and the connector on the back of the gauge.
d. The tools needed to open and close your machine such as screwdrivers and Allen keys.
e. If you will drill a hole in the panel, of course the drill and respective bits and hole saw (it may be necessary to buy one specific for metals if you are drilling the panels of a Rancilio Silvia for example).
Installation process:
For this guide, I’ll consider the installation of a liquid filled pressure gauge with PTFE hoses which is the more universal solution with easier access to components at a better price.
Preparation:
1. For your safety, unplug your espresso machine. If you just brewed a coffee, let it cool down.
2. Take pictures or make videos of the disassembling process or you may not remember the sequence to reassemble, or which nuts and bolts go where.
3. Remove the drip tray and the water reservoir.
4. Remember that the hoses will leak and you don’t want any drop of water in any electrical part. In general, I use a cloth and a rubber band:

5. Open your machine to get access to the pump and hoses. I showed how to open a Rancilio Silvia here: https://youtu.be/gGiFi3-Vb6w
6. Define where you will install the Tee connection and the pressure gauge: the Tee shall be installed between the pump and the boiler (where the water is not hot). Depending on your machine it can be convenient to cut the hose and install the tee in the middle, e.g. in a Gaggia Classic. In a Rancilio Silvia, it’s easier to remove the elbow after the pump and install the tee in the middle.
Notice that I connected the elbow to the braided hose that goes to the boiler, however, a better idea would be to connect it to the Tee and using the elbow to the pressure gauge for more flexibility on the angle depending on where your hose needs to go:
If you will drill a hole in your panel, needless to say that you must be even more careful on taking the measures, simulating where the hoses should go, and if there are any interference with wires, SSR or whatever you have inside your machine. Remember that you will need extra space for the fittings and don’t measure only with your pressure gauge in position. Clampers, Tee, it all adds volume and later you may realize that the hose/pressure gauge should be more to the left or right. Well, you got it!
7. You may need, or it may be easier for your installation, to disconnect the wires and inlet tube from the pump, depending on your machine. In a Rancilio Silvia, I also removed the screws and let it loosen.
8. When screwing / unscrewing fittings, elbows, etc, use a pair of wrenches / adjustable wrench to avoid damaging the components.
9. If you are using threaded connectors, remember to put the nut before connecting the hoses/PTFE tubes.
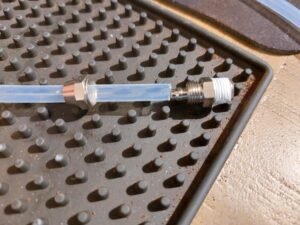
Connecting the hose to the fittings

Wrong: not reaching the end
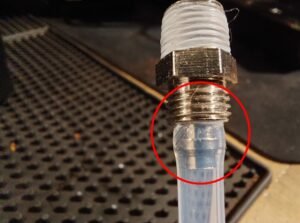
Correct: tube reaches the end
10. Connecting the tee: if you cut the hose and are using PFTE with quick release connections, you will just insert in two sides of the tee making sure that you pressed until it reaches the end of the insertion, or it may leak. If you are using the threaded connections, apply some Teflon tape on the threads.
For Rancilio Silvia: first connect the male fitting (where you will connect the hose that goes to the pressure gauge) to the Tee. Then, the elbow to the Tee and the Tee to the pump. Finally, connect the metallic braided hose from the boiler to the elbow or the upright end of the tee. Remember to adjust the orientation of the hoses or you may overtighten later and that the metallic braided hose will not rotate and you will have to turn the tee + pump until it’s tighten enough.
Good practice: most connections will tighten when you rotate clockwise, then it’s better to apply the Teflon tape clockwise as well (but not always make a difference, just good practice). The teflon tape shall be uniformly applied, then, I recommend buying the narrow sizes, which will probably be 12 mm (1/2 in) in most of the stores, or Loctite 55 cord.
11. Measure the length of PTFE tube needed to connect the pressure gauge, cut it and connect to the Tee.
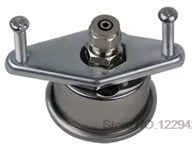
12. Fill your pressure gauge with glycerine. I recommend using a 60 ml syringe with the slip tip (or the threaded one, called Luer Lock tip if you don’t find the slip tip). It will be tough to use the thin ones or the needle due to the high viscosity of the glycerine.
Slip tip

Luer lock tip
13. Apply Teflon tape to the pressure gauge thread and connect the female fitting.
14. Before finishing the installation and closing your machine, I recommend you to test for any leakage. It happened in almost all machines that I modified and I had to redo some sealings.
For this test, you will have to connect the pressure gauge to the tee, put a portafilter with a blind filter in the group head, reconnect the wires and inlet hose to the pump if you had removed, put the hoses in your water reservoir again, and very carefully turn on the machine and the extraction button. You will see the pressure building up, if not, maybe your dimmer is in the minimum or off. Paying attention to the joints you may see one or another drop of water after a few seconds. If you don’t see, and after unplugging your machine, a piece of paper towel in your connections will reveal any small leakage. If all good, disconnect the PTFE tube from the pressure gauge and go to the next step.
15. Pressure gauge final connection:
15.1 External installation of your pressure gauge: insert the PFTE tube in the hole to the external side of your machine, close it, and connect to the pressure gauge. Then, mount the pressure gauge in your 3D printed top box.
In a Rancilio Silvia, you can use one of the holes in the frame:

15.2 Internal installation: make the hole in your panel and mount the pressure gauge with the female fitting already connected, connect the PTFE tube to the pressure gauge and close your machine.